Introduction to JSF 2 Using NetBeans and GlassFishDavid Salter, 14th August 2009
Using NetBeans 6.8M1 and GlassFish v3, its possible to write Java EE 6 web applications. In this article i'll be showing what managed beans look like and how they are linked up in Facelets pages. I'll also show how to localize the application for use with different languages. Finally, I'll show how the Bean Validation Framework (JSR-303) can be used to add simple validation to POJOs.
To show these features, I've written a simple "Hello World" program. You can download the source code here.
This article assumes you have got NetBeans 6.8M1 or above and GlassFish v3 installed. It also assumes you have a basc understanding of JSF 1.
Anatomy of a JSF 2 application.
In JSF 2 applications, Facelets is the recommended view technology rather than JSP. Facelets allows markup to be defined as XML which gives the benefit of it being able to be automatically parsed by IDEs such as NetBeans. I'll assume that you are familiar with Facelets, however you can read more about Facelets in my book "Seam 2.x Web Development".
In the classic "Hello World" application, the user is requested to enter their name. This is the same in our sample application, with the input form defined as:
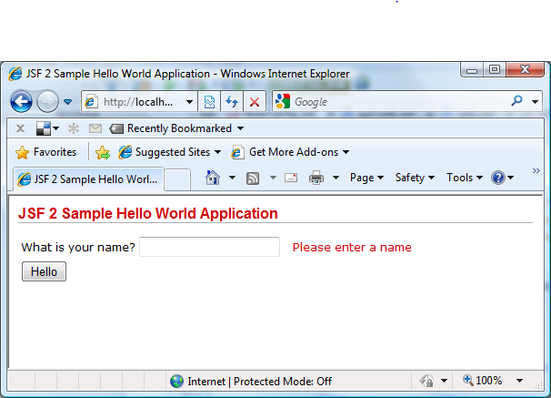
<h:form id="helloForm"> <h:panelGrid columns="3"> <h:outputText value="#{msgs.whatIsName}"/> <h:inputText id="name" value="#{helloBean.name}"/> <h:message for="name" styleClass="error"/> <h:commandButton action="#{helloBean.sayHello}" value="Hello"/> </h:panelGrid> </h:form> 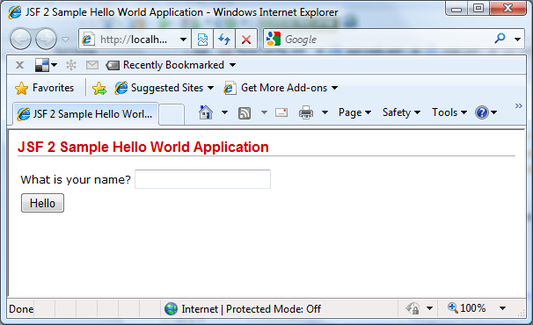 Looking through this form, we can see several things:
JSF 2 Backing Bean
In JSF 1 applications, backing beans were written as POJOs and then declared to JSF via XML configuration within the faces-config.xml file. With JSF 2, backing, or managed beans are declared via Java 5 annotations. To declare a bean as a managed bean, all we need to do is annotate the bean with the @ManagedBean annotation. This annotation takes a name parameter which is the name of the managed bean.
For our simple for shown above, we could write a managed bean as:
@ManagedBean(name="helloBean")
@RequestScoped
public class HelloBean {

    @Pattern(regexp="(.+)", message="{constraint.invalid.name}")
    private String name;

    public HelloBean() {
    }

    public String sayHello() {
        return "hi";
    }

    public String getName() {
        return name;
    }

    public void setName(String name) {
        this.name = name;
    }
}
You can see that this is a smple POJO, however there are several annotations:
 This managed bean therefore has one property, "name", which is bound from the Facelets page using the #{helloBean.name} expression. The bean has one operation, "sayHello", which is invoked from the Facelets page via the #{helloBean.sayHello} expression. In this sample application, pressing the button invokes the "sayHello" method which returns the string "hi" to JSF. JSF then uses the navigation rules within the faces-config.xml file to determine which page to display next. There is nothing different here from a JSF 1 application.
<navigation-rule>
    <from-view-id>/main.xhtml</from-view-id>
    <navigation-case>
        <from-outcome>hi</from-outcome>
        <to-view-id>/hello.xhtml</to-view-id>
    </navigation-case>
</navigation-rule>
To finish off the basic outline of a JSF 2 application, all that is left is to define the resource file for the application localization and the resources for the Bean Validation Framework.
Bean Validation Framework Messages
The Bean Validation Framework reads its localized resources from a file called "ValidationMessages.properties" in the default package of the web application. This file is a simple properties file:
constraint.invalid.name=Please enter a name Application Localization Messages
Application localization messages are stored in a simple properties file. The location of this file is defined within the faces-config.xml file as shown below.
<application> <resource-bundle> <base-name>com.davidsalter.jsf2helloworld.messages</base-name> <var>msgs</var> </resource-bundle> </application> 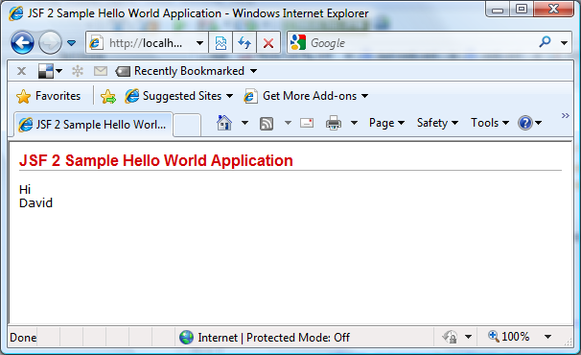 Now that we've seen how a basic JSF 2 application is developed, you can try running the sample application to see it in action for yourselves. I hope this have given an insight into JSF 2 which you can now expand upon by developing further JSF 2 applications.
This article is also available in French.
You can discuss this article here.
|
|