Creating a Simple Spring MVC Web App with NetBeans 5.0 Part 2
Internationalising a Spring Web MVC application is a straightforward task if completed at or near the beginning of a project. The basic procedure is similar to that of many other web frameworks, such as Struts, and involves specifying the messages in a properties file and using a JSP tag to display them inside the web page. This post describes this process. For the development, I'm using Spring 1.2.6 and NetBeans 5.0. The base project for this tutorial is that created in part 1 of this article: Creating a Simple Spring MVC Web Application with NetBeans 5.0
Creating an application Context
In order to load the messages properties file, we need to create an application context configuration file for the entire application. This file is to be called applicationContext.xml and is located in the WEB-INF directory of the project. Within your project, right click on the WEB-INF folder and select "NEW | XML Document...". Specify the filename as applicationContext (NetBeans automatically adds the .xml extension). Select "Next" and choose to create a "DTD-Constrained Document". Enter the DTD Public ID as -//SPRING/DTD BEAN//EN, the DTD System ID as http://www.springframework.org/dtd/spring-beans.dtd and the Document Root as beans. The following screen shot shows these settings.
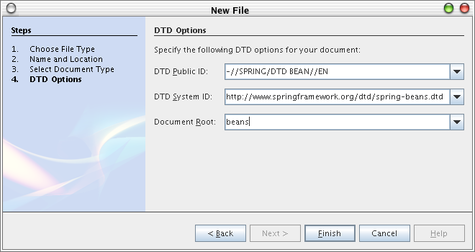 Select the "Finish" button to create the XML file.
Add the following XML into the <beans> section of the file. This file specifies that all the message resources are to be found within a file with a base name of messages. This file can be anywhere on the class path as Spring looks along the class path to find this file.
<bean id="messageSource" class="org.springframework.context.support.ResourceBundleMessageSource"> To make your web application accessible to different languages, all you need to do is create message files for each locale you intend to support. Each of these message files has the string "_locale" appended on to the base name, so for example a French language file would be called messages_fr.properties.
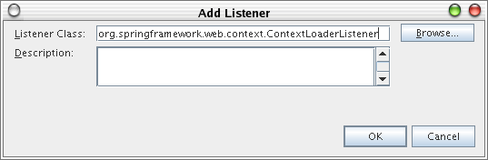
Now that we have created an application context file, we need to tell Spring to load it up. This is performed via adding a listener in the web.xml file for the project. Open this file in NetBeans and select the General tab. Press the Add button under the Web Application Listeners section. On the resulting dialog, enter the listener class as org.springframework.web.context.ContextLoaderListener as shown in the following screen shot.
 Creating a messages properties file
As stated earlier, Spring will search the class path for the messages.properties file so we can place it anywhere on the class path. Right click on the root package in the project explorer in NetBeans and select New | Properties File. Create a new file called messages - remembering that NetBeans adds the .properties extension. In this file, to show how the message properties work, add a single property as below.
applicationTitle=Spring Sample Application..... Linking the message properties file into the JSP page
In the previous stages, we've created an application context, told Spring to load it and created a message properties file to load. Finally, we need to insert the relevant code within the JSP to use the messages rather than use hard coded messages.
Open up the index.jsp file and add the spring tag library as follows:
<%@ taglib prefix="spring" uri="http://www.springframework.org/tags" %> This tag library can now be used to print out our text as follows:
<spring:message code="applicationTitle"/> That's all there is to it. Run the index.jsp file to verify that everything is OK. If not, go back and review the steps above and ensure everything is as expected.
You can discuss this article here.
|
|